It’s a couple of minutes past 5:00 pm and just as I am mentally switching gears to happy hour, I Read the Rest…
Happy Valentine’s Day
Valentine’s Day. Is this the holiday you love to hate, or is that just me? I mean, while I do Read the Rest…
French 75 Punch, Perfect For Your Holiday Party
While Jon and I are all about entertaining, admittedly we tend to enjoy hosting small, intimate gatherings over large, standing-room-only Read the Rest…
Berry Shortcake
It’s strawberry season here in our little neck of the woods, and I could not be happier. The local farms Read the Rest…
While Jon and I are all about entertaining, admittedly we tend to enjoy hosting small, intimate gatherings over large, standing-room-only type of affairs. No doubt this is due in part by the size of our house (or lack thereof), but it’s also just a general preference of these two extroverted introverts to be in a room where we know everyone and have the time and space to actually talk to each guest.
However, this last year, we found ourselves hosting several (much larger) events. While large soirees are a teensy bit out of our norm, we found that by making slight adjustments to our “make-a-plan/work-the-plan” entertaining mantra, we’ve been able to use many of our basic entertaining principles, whether our guest list is 12 or 112.
This has been especially true for Jon. For those of you who follow this blog regularly, you know that Jon is known for his bartending skills. Not only does he serve a lot of cocktails to guests (and often takes over the bartending at friends’ homes), he also serves a quality cocktail. (Okay, let’s just say, a damn fine cocktail.) We have found that, even for a crowd of 12, the first 30 minutes of a party go much more smoothly if we stick to a single signature cocktail, rather than trying to accommodate 12 individually crafted drinks. And now, by using the basic principle of scaling, we have successfully achieved the ability to serve a good, balanced and well-crafted cocktail for 100. This is also commonly referred to as a “punch.”
For a recent Christmas party, we served a French 75 cocktail (featured on our blog here), from a punch bowl. In this case, “punch” is a very appropriate name. It’s not the watered down version of the punches from the 50’s, although we did put my mother’s vintage punch bowl to good use. But don’t be fooled; this drink is the same strength as when it’s served in a martini glass. We refilled the punch bowl 4 times in 45 minutes. And let’s just say there were a lot of very happy people in the room.
We premixed the lemon juice, gin, and everything else except the Champagne, and then determined how many ounces of the base mix to add with each bottle of Champagne. This allowed us to quickly and easily top up the punch bowl whenever it started getting low, without having to open the Champagne ahead of time. An ice ring kept it cold (and actually outlasted the punch).
Given the beautiful color of this punch, it would be perfect to serve at your New Year’s Eve party.
It seems I have become infatuated with frozen water.
Honestly, my love affair with ice is not a new thing. I’m the one that, at those self-fill soda machines, gets the largest cup available and fills it to the brim with ice. Then I add a little soda. Soda is good but a lot of ice is what it’s all about. Then came those fabulous ice molds, and freezing water became my favorite sport. After making the decorated ice rings (over and over again), I didn’t think freezing water could get any more fun. And then. I found a new twist on ice cubes. Move over ice molds. There’s a new kid in town.
Typically, it’s miniature versions of anything that I’m drawn to. Seriously, aren’t mini quiches so much more, well I don’t know, fun than a standard one that serves 10? And who can resist a bite-sized cookie or mini marshmallow? But, in this case, it’s the grande version of an ice cube that is capturing my fascination.
Here’s the appeal of these things. Because of their (large) size, they don’t melt as quickly as their smaller counterparts. Which makes them the perfect solution for summertime (or any warm weather) cocktails. They provide the desired cold while avoiding the dread of a watered-down cocktail.
We first got to experience these wondrous lumps of cold while visiting friends in Florida. (If ever there was an environment for testing the longevity of an ice cube, Florida is it.) Based on what she had learned with her mold, when I went shopping for ours, I looked for one that also came with a tray and cover. While silicon is great for freezing water, it’s not equally great for sitting (or freezing) flat unless it has something sturdy underneath. There are many similar ones to choose from but it was the tray and cover that sold me on this one (click here to see it on Amazon). The compact size is also great.
We normally serve our grapefruit martinis straight up, in a martini glass. However, lately as the temps have been rising, we’ve switched to serving these cocktails over ice (literally used in the single tense here, as in one large ice cube). A grapefruit martini on the rocks is the perfect summer cocktail.
Please be forewarned that looks can be deceiving and don’t be fooled by the pretty and innocent appearance of this drink. These are martini-strength cocktails that just happen to be served cold over ice. Dang if this doesn’t make one good adult beverage.
My sister-in-law, Lisa, showed up the other day with a present for me. It may be one of the best gifts of all time. It’s a mold for making ice rings. All I can say is this girl has a new toy and all she wants to do is play with it.
I have seen lots of pictures of ice rings on Pinterest and in magazines, and they usually came with DIY instructions on how to make an ice ring that involves using an large, empty plastic water or milk container and some duct tape. While it’s always looked pretty doable, I just never got the energy (or the right size container) to actually try making one.
My new mold makes making an ice ring very simple. You just place whatever you want in the ice ring inside the mold, add water and freeze. (Best of all, no duct tape required.)
Since I had some recent experience making ice molds for a punch bowl, I used the same layering technique with this mold. By freezing the water in layers, it solves the problem of the fruit or leaves all floating to the top (which then becomes the bottom of the ring).
I think the best part of this ice mold is it comes with a stand that catches all the water as the ring melts. Genius.
Never mind the fact that I now want to serve white wine with every meal simply so I can use can my new ice ring mold. I just keep thinking of different and fun ways to decorate water and I want to try every one of them.
I love a good Bloody Mary. There’s just nothing like a frosty pint glass full of spicy tomato-y goodness overflowing with a salad bar of garnishes. A well-made (and well-dressed) Bloody Mary is a thing of beauty. But I have a confession to make: I can’t make a good one to save my life.
Until now.
As much as I enjoy Bloody Marys, making a decent one myself has always been a kind of unachievable “holy grail.” And maybe a bit of an embarrassing shortcoming as an amateur mixologist. A big part of this is because Bloody Marys are traditionally enjoyed in the morning (often well before noon) and that’s just not the time of day when I do much experimenting with cocktail recipes. No judgment here…but for me, I kind of feel like I’ve committed myself to an unproductive day if the vodka comes out while the coffee is still brewing. So my efforts at perfecting a Bloody Mary recipe have been somewhat limited.
One of our friends makes an outstanding Bloody Mary. A LOT of ingredients go into his creations; he looks like a mad scientist hunched over the bar as he measures and tweaks and fiddles to get everything just right. It’s an intimidating process! So, while it seems like something I should know how to make, whenever one of our guests suggests a round of Bloodys to kick off the day, I defer and ask if they have a favorite recipe and, if so, if they’d like to stand in as guest bartender. Or we go out for brunch and leave the mixing to the professionals.
Not that I haven’t made a few attempts. The fundamental ingredients are pretty well-known: Vodka, tomato juice (or V8, which most enthusiasts seem to prefer), Worchestershire sauce, horseradish, various salts (garlic, celery, seasoned) and peppers, a dash of Tabasco, a squeeze of lime, and a nice, leafy stalk of celery. Additional garnishes can vary widely, and this is a cocktail that benefits from a “more is better” attitude. Green and black olives, dill pickles, peperoncinis, cherry tomatoes, jalapeño slices, spiced green beans, pickled asparagus spears, shrimp, oysters, bacon, the list goes on. No wonder the term breakfast in a glass is so fitting.
So how could it have been so hard for me to make a reasonably good Bloody Mary? Mine always ended up tasting like something was missing (how is that possible when I already threw in everything but the kitchen sink?). I still have detailed notes from several attempts going back more than 3 years. I tried Chipotle-infused vodka. I tried wasabi and Sriracha. I tried more of this and less of that, but with so many ingredients it was impossible to figure out which ones were out of balance. Frustrating.
So what, finally, was the answer in my search for the best Bloody Mary? I’ve simplified. Thanks to a tip from a local bartender (whose recipe is one of the best I’ve ever had), I’m using an amazing off-the-shelf seasoning mix! A little part of me feels like this is cheating. And maybe it is. But the whole concept of our blog is how to make entertaining easy and fun. So, by that definition, my Bloody Mary recipe is a complete success — because it’s easy, fun to make, and pretty darn tasty if I do say so myself. In fact, it’s so easy and fun that, for those days when a Bloody sounds just right, we’ll be setting up a “do it yourself” (or DIY, for those of you not spending all your time on Pinterest) Bloody Mary station at our bar. Try this yourself: Set out the ingredients, garnishes, and a bucket of ice, provide the basic mixing instructions, and let your guests channel their own inner mad scientist. No fuss, no intimidation, just perfectly-customized cocktails. All before lunch. Hmmm, that suddenly sounds like a pretty productive day after all…
Punch for parties. Talk about something that has been around forever. A quick search on the internet told me that the concept of punch originated in India (originally called “paantsch”) and was brought to England by sailors. The word meant “five” in Hindi and described the 5 ingredients found in the punch. Several hundred years later, and by the time I got to college, the concept of punch had slightly morphed into something we all called “Spodie Odie” which was a mixture of several kinds of alcohol, fruit juice, and cut up pieces of fruit. There seemed to be no concern as to what kinds of alcohol were used. Nor did anyone seem to care that the punch bowl was actually a large garbage can. It wasn’t until years later that I found myself hoping that someone had actually washed the garbage cans before they were used for our punch.
After college, my mom gave me her punch bowl. A pretty glass bowl and stand with matching cups. It was already fairly well used by that point, having served duty at various parties over the years. Every year at Christmas, Mom made her homemade eggnog in it. After it was bequeathed to me, for the next 20 or so years that punch bowl continued to get a lot of use, both at parties I hosted as well as the many times I loaned it to friends. Nowadays, it isn’t used as frequently but still finds a purpose at an occasional party.
I love this quote from 1832: “The punch-bowl was an indispensable vessel in every house above the humblest class. And there were many kindly recollections connected with it, it being very frequently given as a present. No young married couple ever thought of buying a punch-bowl; it was always presented to them by a near-relative.”
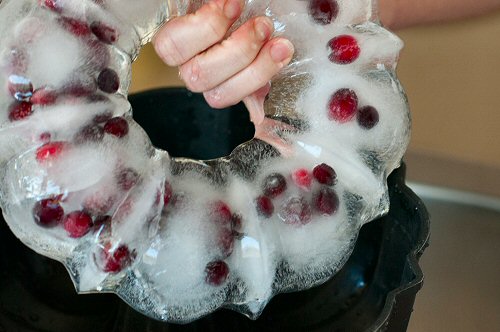
Along with the punch bowl, I acquired the art of making an ice ring. I’m pretty sure the English in the 1700’s did not make ice rings for their punch. But it’s not a new concept for me. I’m not even sure how or where I learned to make one. It’s just something that I know how to do. And, since it seems like something a good host or hostess should have in their entertaining bag of tricks, I’m sharing the how-to with you. Ridiculously simple to do yet something that always gets remarks at a party. (“How did you make that???” It’s somewhat embarrassing to admit all I did was freeze water. It makes me wish it really was a little more difficult to do.) But, most importantly, it solves the problem of keeping a punch cold without using ice cubes, which melt more quickly than an ice ring and dilute your punch somewhat.
When I make an ice ring, I most frequently use my Bundt pan. But any mold, preferably with a hole in the middle, will work. I start by putting just a little water in the bottom of the pan and then lining the ring with whatever fruit or garnish I’m using. You can use anything for the garnish keeping in mind that, as the ice melts, the garnish may/will end up floating in your punch. Also, make sure that the garnish freezes well and won’t turn brown when wet or frozen. I have used all different kinds of sliced citrus, berries and even holly.
Put the pan in the freezer until the water freezes. Then add another layer of cold water, keeping in mind that the fuller the pan, the larger the ice ring will be. Return the pan to the freezer and freeze until solid, several hours or overnight. There is a reason for doing this in layers. Because the fruit/garnish floats, by freezing it first in a shallow layer, it will remain on top of the ice ring, instead of floating to the what will become the bottom of the ice ring in your punch bowl.
To remove the ice ring from the pan, simply run warm water over the bottom of the pan until the ice ring releases.
After the first layer (with garnish) is frozen, add more water and freeze again.
After the second layer is completely frozen, run warm water on the bottom of the pan to release the ice ring.
Remove the ice ring from the pan and float, garnished-side up, in your punch bowl.
Last night the Hostess and I made another appearance as guest bartenders at Salon Rouge, one of our favorite local businesses, for their annual Holiday Open House. It was our third year consecutive year, so I guess it’s now officially become a holiday tradition for us. While the mission of our blog is to teach our tips and tricks to others, we also know that it’s good experience for us to occasionally “walk the talk” and see how well our advice works outside the comfort of our own home. Plus, we’re both regular customers of the salon so we’re happy that they give us this opportunity to help them out.
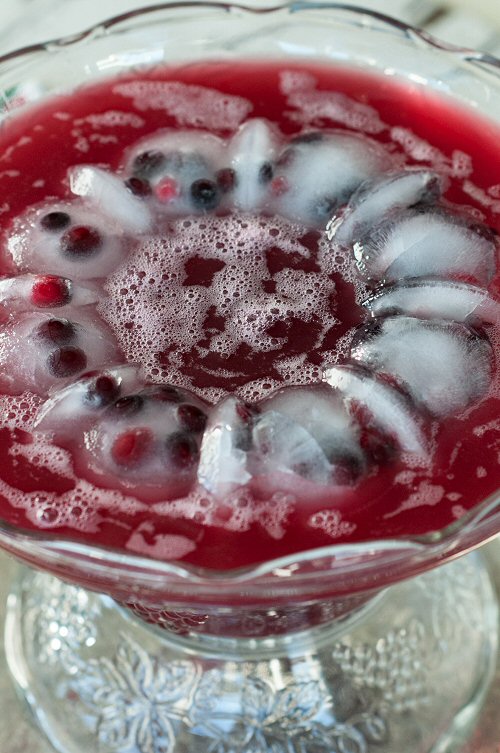
Each year Rachel and Karin, the owners, ask us to come up with a “signature cocktail” for the event. As in past years, we needed something red (partly to be in the spirit of the holiday season, but mainly because of the “Rouge” in the salon’s name). The past two years we’d served drinks (Pomegranate Martinis and Cosmopolitans) that were already in regular rotation at our home bar, but this year we decided to come up with something new. The Hostess took to the interwebs and found several ideas to run past me. Since we’d played with infused simple syrups last summer, I really liked one recipe that featured a simple syrup infused with cinnamon sticks and cloves. Plus, two of the key ingredients were cranberry juice and champagne. Red and festive? Check!
We experimented and made some adjustments to scale things up to “punch bowl size” in order to easily serve a large group. When serving cocktails from a punch bowl you need to consider a few things. First, you need to be prepared to replenish the punch from time to time so that the bowl stays close to full (there’s nothing sadder than a nearly-empty punch bowl crying “The fun is about to end”!). Second, you want the punch well-chilled without having to add a ton of ice, since melting ice will quickly water down the top couple inches of your punch. And third, in the case of a champagne punch, it’s best served “up” — you don’t want to ladle chunks of ice into your guests’ glasses. Debbie solved the ice challenges with a spectacular cranberry “ice ring” that she made in a Bundt pan, and we pre-chilled all of the ingredients so that the punch was cold to begin with. An ice ring is perfect for a punch bowl cocktail as it melts much more slowly than crushed ice. Debbie’s cranberry ice ring added a festive flair as, over the course of the evening, it slowly gave up its cranberries and they ended up floating on the surface of the punch.
Everything in the punch bowl was alcohol-free so it was easy to serve virgin cocktails to kids and non-imbibers: We simply filled their glass halfway from the punch bowl and topped with sparkling cider. And the rest of the crowd loved watching how we’d start by putting a dash of Grand Marnier into their glasses (“What’s THAT??“) followed by the punch and champagne. Adding the bubbly to the glasses at the last minute, instead of directly into the punch bowl, made sure that everyone’s drink was fresh and sparkly.
So enough about the process. Can I just say how incredibly GOOD this punch is? Tart and tangy cranberry and light, refreshing champagne, layered over warm spices and rich-orange Grand Marnier. I mean, seriously. I’ll probably never again smell potpourri without craving a champagne flute full of our holiday punch. Keep the ingredients for this recipe on hand from Thanksgiving through New Year’s Eve and you’re good to go for all your holiday entertaining.
Depending on where you live, throughout much of the United States this has been a winter for the modern-day record books. One that most people are looking forward to saying “goodbye and good riddance” to. I have to admit that I’m the lone exception. In the Colorado mountains where the Hostess and I spend our winters, the higher angle of the sun and above-freezing temperatures ushered in by the month of March bring about (in me, and a handful of like-minded ski bums) feelings of melancholy. I’ve always been one for whom changing seasons trigger emotions: Excitement for what’s coming, and a bit of remorse for what’s passing. And March’s arrival and the snow’s accelerating departure mean that the season of skiing that I so look forward to every year is entering its final few weeks. So even though it’s almost time to put away the snow shovels and break out the golf clubs, this time of year always leaves my heart feeling a little heavy.
Don’t get me wrong. I can be just as excited as the next person about the coming of spring (see this post from last year). And as an amateur bartender, I love that the change of seasons also means a change of cocktails. Just as the Hostess always tells me that people shouldn’t wear white between Labor Day and Memorial Day, there are cocktail aficionados who believe that certain drinks are best reserved for the long, dark months of winter, while others go better with warm weather. So I do get excited that it’ll soon be time to break out some warm weather cocktail recipes and shuffle some bottles from the back of the bar to the front. Kind of like spring cleaning…but way more fun.
But let’s not rush these things along just yet.
A few weeks ago I wrote about how the Old Fashioned is a perfect mid-winter’s cocktail. And before this winter completely slips away, it’s only fair that another one of my whiskey-based favorites — the Manhattan — gets some headlining space on our blog. I do like cocktails that have stood the test of time, and the Manhattan dates back to the late 1800s. It has an air of class and sophistication, yet it’s quite easy to make. Once you’ve selected your favorite rye or bourbon and the appropriate martini-style glass, it’s simply a matter of measuring out the right proportions and mixing up your cocktail. The one trick I’ve learned is that, as much as I like using my shaker, the Manhattan is best when stirred, not shaken. Otherwise you end up with a frothy, foamy drink that’s not visually appealing (someone once said the receding foam reminded them of “pond scum”). Personally, I like to make the Manhattan in a Boston-style cocktail shaker; I mix and chill the ingredients by slowly pouring them back and forth a few times between the two shaker halves before straining into a chilled glass. The result is a clear, crisp frosty-cold cocktail that’s hard to resist.
I must admit that, after a winter spent sampling various bourbons and ryes while perfecting my Old Fashioned recipe, I’ve really come to like and appreciate these darker spirits. And this March it feels as though, as I prepare to say goodbye (for a few months, anyway) to my seasonal ski-bum lifestyle, I’m also saying farewell to some new friends like Mr. Woodford and Mr. Templeton. So time’s a-wasting. Stir up a Manhattan and join me in a toast to the end of winter before the last of the snow is gone!
I have a confession to make. Although I’ve presented myself as the cocktail guy on our blog these past 18 months, I’ve been hiding a dark secret: Four times out of five, when happy hour is drawing near, you won’t find me reaching for my cocktail shaker and jigger. I’ll instead be crouched in front of my beer fridge, selecting the perfect bottle or can of craft beer from an extensive selection of my favorite breweries, which I’ll then pour into a glass (from an equally extensive beer glass collection) that’s just right for the style of beer I’ve chosen. “Hello, my name is Jon, and I’m a craft beer junkie.”
Don’t get me wrong. I positively love being the person who knows how to serve a wide range of cocktails, and who, through educated guesses, can even occasionally create something new. And I have many more cocktail recipes to write about on this blog in the coming months. But I do like my beer. Especially the big, bold, hoppy styles from craft breweries in California, Colorado, Washington, and Oregon. So, contrary to my blog persona as “The Bartender”, sometimes my bartending tool of choice is nothing more than a bottle opener.
I never thought I’d be confessing my love of craft beer on our blog. We aren’t running a “beer blog” here…there are plenty of those already. And I really don’t think any of you want to be bored with minutiae such as when an IPA crosses over to being an Imperial IPA, or why I get excited when reviewing the brewer’s list of hop varietals that were used during dry-hopping. But the other day a friend of ours (who shares my craft-beer obsession) showed up with a really cool surprise, and I can’t keep my enthusiasm for craft beer bottled up (sorry) and off the blog any longer:
“It’s a can…it’s a growler…”
“No…it’s the Crowler!”
Seriously, what’s not to love about this. Let me explain what you’re seeing here. This brewer (Oskar Blues, one of my faves) has taken the “growler” concept to new heights. A growler is a refillable glass container that allows you to get beer “to go” from your favorite taproom, fresh out of the keg. It’s a great way to enjoy beers at home that otherwise might not be available through conventional stores. Oskar Blues is a leader in the revolution to put craft beer in cans instead of bottles, and they’re now filling and capping these giant 32 ounce cans at their brewery while you wait (hence, the can-growler, or “crowler”). For size comparison, the green can to the right is a normal-sized 12 ounces. The brew in this particular example is a special, tap-only version of Oskar’s “Mama’s Little Yella Pils” (a light, pilsner-style craft beer) that’s been aged in a tequila barrel. Wow. The innovation in today’s craft beer industry blows me away. I’m getting thirsty just writing about it.
Phew…it feels good to get that secret off my chest and out in the open! Thanks for listening. I’ll be back behind the bar shortly…but in the meantime drop me a comment and let me know if you share my obsession!
A few evenings ago, the Hostess and I tended bar for a local business at their annual holiday open house. In case you’re keeping score, this was my second gig as a guest bartender – back by popular demand (or maybe just because the Hostess did a good job of farming me out) for the same event as last year. This year we decided to serve the Cosmopolitan. The Cosmo is quick and easy to make and, with its cranberry flavor and festive color, it’s the perfect cocktail for Thanksgiving and Christmas entertaining. Our Cosmopolitan recipe proved to be a big hit that evening, and I was surprised that, while most of my “customers” had heard of the Cosmopolitan, several had never actually tasted one. One person even commented that she didn’t think people drank Cosmos any more; after a few sips won her over she agreed with us that it’s high time for those people to start again.
As with last year’s event, we also wanted to offer an alcohol-free alternative to the featured cocktail so I set about concocting something that would have the same signature flavors as a Cosmopolitan. It needed the tartness of cranberry, the hint of tangy-sweet orange (normally provided by the Cointreau), along with the subtle bite of lime juice that holds all the flavors together in perfect balance. Plus some effervescence to round out the edges usually occupied by the vodka. After a few rounds of measuring, pouring, tasting, and tweaking, we’d created a virgin Cosmo Punch that was awarded the Hostess’ seal of approval. We mixed up a punchbowl-full for the open house and it earned five-star reviews from drinkers and non-drinkers alike. The best endorsements came from employees who first opted for the punch, then upgraded to Cosmopolitans once their shifts ended, and declared both to be equally delicious.
The fun and festive open house was a nice way for the Hostess and me to kick off our holiday entertaining season, and we enjoyed introducing (and re-introducing) people to the Cosmopolitan. Cheers!
There’s something about that first really nice spring day. Not that day where there’s still a chill in the air in spite of the sun being out, when you think it just might be warm enough to get by without a jacket but every light breeze convinces you otherwise. No, I’m talking about that one day, when the sun breaks out early enough to really cut through the coolness of late winter, and it stays warm even as afternoon turns into evening, and there’s just something about the way it feels, the way it smells, that causes your subconscious to suddenly decide that it’s summertime. Fleeting thoughts of barbecues, beach parties, and happy hours on the patio suddenly flood your mind as if they’d happened only yesterday, and your spirit fills with happiness and optimism for the coming warm and carefree days. If you live as we do in a place with fickle weather, this first really nice day is all the more special: Knowing it’s only a cruel tease, you savor every minute to help carry those warm feelings with you through the chilly weeks ahead.
I contend that the margarita exists specifically for the purpose of helping inspire those warm feelings of lazy summer days. Maybe it’s the result of good marketing by the tequila industry, but when I think of a margarita, I feel the same emotions that are triggered by that first nice spring day.
Of course, the margarita will also always remind me of my very earliest experiences as a bartender, when the Hostess and I became somewhat notorious for serving blended margaritas at various functions for our extended “corporate family” after a work-related relocation took us to a different part of the country. Back then we re-purposed a vintage airline ski boot bag into a travel case for an almost-vintage blender. And over the years our “blender well traveled” mixed many a margarita for friends and acquaintances in kitchens, family rooms, and ski condos throughout the Rocky Mountain area. (As a side note, this also reminds me of the many dangers of over-serving: One of our fellow partiers, years after spectacularly purging several helpings of my margaritas, unfortunately became the senior manager over my organization at work. Having been the server, and first-hand witness, at this event was likely a career-limiting move on my part). As my friends now hear as I hand them a cocktail, “Respect the Drink…”
But I digress. There are many of you who’ve probably been wondering why it’s taken me so long to get around to writing a tequila post, so without further ado (and just in time for Cinco de Mayo) over the next few days I’ll be posting several of our favorite margarita recipes. Whether you prefer rocks or blended, salted or not, there’s something here for everyone. For starters, here’s the recipe for our Blended Gold Margarita. Stay tuned for the next round!
The Hostess and I recently spent an extended weekend at The Wickaninnish Inn on the remote western coast of Vancouver Island, near Tofino, British Columbia. “The Wick,” as it’s known to the locals, is at the end of a long and winding mountain road that cuts across the island, a 3-hour drive from the nearest ferry back to the mainland. As we discovered, the Wick has an outstanding restaurant and a stellar bar where I was reminded that, while I really enjoy making and serving drinks, there are people out there whose creativity and passion for bartending put them in a whole different league. I guess that, being in such a remote place, I didn’t expect to find much of anything too far from the mainstream. I couldn’t have been more wrong — we’d stepped into a world where handmade ingredients and unusual recipes were the norm. I was thrilled to open the Wick’s seasonal cocktail menu to an entire page of drinks entitled “Homage to Campari,” an Italian liqueur that’s the key ingredient of one of my favorite cocktails, the Negroni. Suffice it to say I didn’t make it beyond that page our first night at the inn.
By our final night, though, it was time to branch out. All in the name of field research, of course. I landed on a page specifically devoted to Whiskey Sours. While I do enjoy an occasional bourbon, it’s usually in the form of a Manhattan. I loved whiskey sours in my early 20’s but since that time have held the opinion that a real whiskey drinker would never ruin their liquor by masking its flavor in a “sour.” But as I read, “Sours are simplicity personified with spirit, fresh lemon and sugar in balanced perfection,” I thought, “Whoa, I gotta try one of these!” One concoction in particular caught my eye: the Cedar Sour, made with cedar-infused Canadian rye whisky. Our bartender Hailey grinned when I ordered one and proudly announced that the Cedar Sour was her personal creation. While she shook one up for me she explained her process of preparing the cedar, infusing the rye whisky (and why she chose the particular brand), making the lemon-thyme-infused simple syrup, and how she went through many iterations before settling on the perfect recipe. The drink, she said, should instill a recollection of a sauna — which in some contexts seems like it could be so wrong — but in the subtlety and complexity of her cocktail was so right. It was truly and unexpectedly incredible. Yet another of my long-held opinions blown to bits.
Hailey sent me home with instructions on how to find her Cedar Sour recipe on the web, and I encourage you to check out the fascinating link here: Link to Hailey’s Cedar Sour. I’m humbled, and hopefully inspired, by such greatness.
A final note for you spelling purists, the bar menu spoke of whiskey when referring to bourbon-based sours, but it used the proper Canadian spelling of whisky in the recipes using rye. There’s just so much to learn when conducting field research!
I have to admit, it doesn’t seem all that long ago that bartending at home, to me, meant having a cooler full of beer sitting on the back patio and a bottle of tequila and a few limes on the kitchen counter. And if it was supposed to be a classy party, maybe some store-bought margarita mix to go with that tequila. And a bottle or two of wine. Oh, and a stack of Solo cups.
I’ve learned a great deal about making and serving drinks since those days (thanks especially to The Hostess’ passion for entertaining), and needless to say my approach to bartending has evolved pretty extensively, and mostly for the better. I’m the half of the Entertaining Couple who’s responsible for ensuring our guests have a frosty beverage in their hand as soon as they walk in the door. And occasionally writing about my experiences in our blog these past few months has helped me realize that I really have developed some competence on the serving side of the bar (my competence on the drinking side of the bar was already well-established).
A major part of what’s helped me get good at all of this is the setup of my home bar. From the tools and glassware, to the types of booze I make sure are always in stock, right down to the location of the bar itself, having a great bar makes all of this easy and fun. I’ve just finished writing a four-part series of tips for easily and inexpensively setting up your own bar at home. Even if you already have a cabinet full of liquor and you entertain regularly, I encourage you to take a quick look at our Perfect Bar category in our collection of Entertaining Tips. There may be an idea or two that you’ll find useful.
Oh, and please leave comments with your own ideas you’d like to share!
As The Hostess observed a couple days ago, the holiday season is already upon us. This time of year, opportunities abound for liquid celebrations with friends and family. It’s been almost four months since we launched our blog, and I (your humble Bartender) have been somewhat lax in developing content for our bartending tips. So, just in time to help with your holiday pre-functioning, I’ve gotten my writer’s butt in gear and am working on a four-part series of tips on how to create and stock your home bar. Part One is now posted with the rest not far behind. Watch the Perfect Bar category under our Entertaining section for more. Cheers!
I’m not sure how or why it happened, but the “when” part is pretty clear. It was just before Christmas back in 1998 and we were at an office dinner party at the home of the Hostess’s new boss. Our jobs had taken us to a new part of the country a year earlier, and Hostess and I had recently gained some notoriety among our company’s skiing and happy hour cliques, thanks to a killer recipe she’d created for blended margaritas. “Have blender will travel” had become a bit of a mantra for us. And because, more often than not, I was the person operating the blender, I was beginning to get the hang of serving drinks to big, boisterous groups, and people were starting to associate me with really good adult beverages.
So, at the holiday gathering, we were opening the traditional “I’m so thankful and lucky to have you working for me” Christmas gifts, and the boss had given Hostess a trendy-looking book on cocktails both classic and modern. Something about the title, Cocktail: The Drinks Bible for the 21st Century connected with me. And when I say connected, I mean I nearly dislocated Hostess’s wrist and elbow as I snatched the book from her hand. I was fascinated. A half-hour later I was gently reminded that we weren’t invited to the party so that everyone could sit around and watch me read. Oh, and also that the book was her gift, not mine. Oops.
It was pretty much right at this point that my passion for mixing and serving drinks took root. At heart, I’m a techie. I think like an engineer and I love to understand how things work. And strangely, the process of constructing cocktails fits comfortably into my nerd universe. I once commented that “Making drinks is easy, it’s just math!” (Yeah, that got some weird looks.) I’m a meticulous measurer — I’ll never be the flashy bartender who flings stuff into a shaker. And I’m also super picky about mixers. And fruit. (Watch for subsequent posts on those and other topics). But none of that means that it’s hard or that it takes any special talent to be the person everyone looks to when it’s getting towards “that time of day.” With a little preparation and some basic know-how, you can make it look effortless.
My goal on our blog is to share with you my tips, tricks, and experiences, and hopefully you’ll get something out of them that’s useful to you. I’m pretty new to this writing stuff, and I’m way behind on getting my recipes posted, but bear with me as I get rolling.
Sadly, the Cocktail book is now out of print, although copies can still be found on the Internet. The author, Paul Harrington, used to write a regular cocktail column for Wired Magazine. My copy (um, I mean Hostess’s) is not for sale.
My signature cocktail is, without question, my Lemon Drop. Our return guests expect them as soon as they walk through the door. Year over year I probably serve as many lemon drop martinis as all other drinks combined. Hostess Debbie positively loves a good lemon drop martini, so years ago when I really got interested in developing my skills at mixing cocktails, the lemon drop was one of the first recipes I took on. But mastering the lemon drop martini proved to be surprisingly difficult – and the lessons I learned in the process made me much better at bartending.
Looking back, I had several different challenges to overcome. First, I’m the kind of person who reads users’ guides cover to cover. Next, I don’t like to deviate from a plan once it’s in motion. Add those traits together and there I was, trying to convince Debbie that she really should be enjoying the crappy drink I’d served her because I’d carefully followed the recipe in my cocktail book so it had to be good! So here’s my Lesson One: Be flexible and open-minded, listen to what your guests like (and don’t like), and be ready and willing to make adjustments. Your guests’ satisfaction (not your own) is what matters!
A challenge with learning any new cocktail is that you have a limited number of attempts in a given day to perfect your recipe before you (and your fellow tasters) get too snockered to distinguish the adjustments you’re making from round to round. (This is why wineries offer spittoons. Although, honestly, “swirl and spit” has never worked for me). So it may take multiple happy hours of tweaking before you find the right proportions for a cocktail you can be confident will be a hit with your guests. Lesson Two: Don’t rush the process, and don’t get discouraged. It can take much trial and error to find the right recipe. Taking notes on what’s worked so far and what changes you’re going to try next time is a good idea, in case your “tasting session” results in short-term memory loss.
My early lemon drop martinis flat-out didn’t taste good. I was basically serving up a too-strong vodka shot paired with a face-puckering slap of sour lemon. The goal of any great cocktail is balance, where each of the ingredients complements the others. My cocktail book suggested using simple syrup to smooth things out, but adding more of that only made the lemon drop sweeter, not more balanced. So I tried different vodkas, tried adding triple sec, experimented with a squeeze of orange in addition to the lemon, and tweaked and fiddled with the proportions. Weeks later my lemon drop had improved from “Yuck!” to “Huh, that one’s not quite as nasty.” Progress, but I still had a ways to go.
Finally one evening I replaced the simple syrup with a splash of premium lemonade. Wow. The resulting lemon drop was crisp, refreshing, and perfectly balanced between sweet and tart, yet still packed enough kick to remind why people consider the lemon drop to be a martini. Success!!!
Which brings me to Lesson Three: The key secret ingredient to a cocktail may be simpler than some exotic concoction you’ve made from scratch or spent a lot of money on. It’s not cheating to use something off the shelf – all that matters is that your guests like the end result!
So now, when Debbie’s considering ordering a lemon drop in a bar or restaurant, she can tell merely from how one looks on the server’s tray whether or not it’ll be any good. She says I’ve set the bar so high that, instead of taking a chance on the bartender’s recipe, she’d just as soon wait for one of mine at home. That’s a pretty good endorsement!


 However, this last year, we found ourselves hosting several (much larger) events. While large soirees are a teensy bit out of our norm, we found that by making slight adjustments to our “make-a-plan/work-the-plan” entertaining mantra, we’ve been able to use many of our basic entertaining principles, whether our guest list is 12 or 112.
 recent Christmas party, we served a French 75 cocktail (featured on our blog here), from a punch bowl. In this case, “punch” is a very appropriate name. It’s not the watered down version of the punches from the 50’s, although we did put my mother’s vintage punch bowl to good use. But don’t be fooled; this drink is the same strength as when it’s served in a martini glass. We refilled the punch bowl 4 times in 45 minutes. And let’s just say there were a lot of very happy people in the room.


 As much as I enjoy Bloody Marys, making a decent one myself has always been a kind of unachievable “holy grail.” And maybe a bit of an embarrassing shortcoming as an amateur mixologist. A big part of this is because Bloody Marys are traditionally enjoyed in the morning (often well before noon) and that’s just not the time of day when I do much experimenting with cocktail recipes. No judgment here…but for me, I kind of feel like I’ve committed myself to an unproductive day if the vodka comes out while the coffee is still brewing. So my efforts at perfecting a Bloody Mary recipe have been somewhat limited.
 So what, finally, was the answer in my search for the best Bloody Mary? I’ve simplified. Thanks to a tip from a local bartender (whose recipe is one of the best I’ve ever had), I’m using an
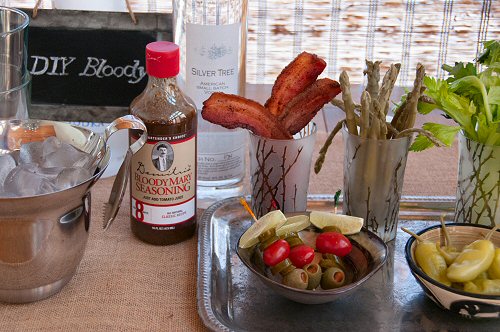


 After college, my mom gave me her punch bowl. A pretty glass bowl and stand with matching cups. It was already fairly well used by that point, having served duty at various parties over the years. Every year at Christmas, Mom made her homemade eggnog in it. After it was bequeathed to me, for the next 20 or so years that punch bowl continued to get a lot of use, both at parties I hosted as well as the many times I loaned it to friends. Nowadays, it isn’t used as frequently but still finds a purpose at an occasional party.


 Manhattan — gets some headlining space on our blog. I do like cocktails that have stood the test of time, and the


 bite of lime juice that holds all the flavors together in perfect balance. Plus some effervescence to round out the edges usually occupied by the vodka. After a few rounds of measuring, pouring, tasting, and tweaking, we’d created a
 relocation took us to a different part of the country. Back then we re-purposed a vintage airline ski boot bag into a travel case for an almost-vintage blender. And over the years our “blender well traveled” mixed many a margarita for friends and acquaintances in kitchens, family rooms, and ski condos throughout the Rocky Mountain area. (As a side note, this also reminds me of the many dangers of over-serving: One of our fellow partiers, years after spectacularly purging several helpings of my margaritas, unfortunately became the senior manager over my organization at work. Having been the server, and first-hand witness, at this event was likely a career-limiting move on my part). As my friends now hear as I hand them a cocktail, “Respect the Drink…”
 end of a long and winding mountain road that cuts across the island, a 3-hour drive from the nearest ferry back to the mainland. As we discovered, the Wick has an outstanding restaurant and a stellar bar where I was reminded that, while I really enjoy making and serving drinks, there are people out there whose creativity and passion for bartending put them in a whole different league. I guess that, being in such a remote place, I didn’t expect to find much of anything too far from the mainstream. I couldn’t have been more wrong — we’d stepped into a world where handmade ingredients and unusual recipes were the norm. I was thrilled to open the Wick’s seasonal cocktail menu to an entire page of drinks entitled “Homage to Campari,” an Italian liqueur that’s the key ingredient of one of my favorite cocktails, the Negroni. Suffice it to say I didn’t make it beyond that page our first night at the inn.
 A major part of what’s helped me get good at all of this is the setup of my home bar. From the tools and glassware, to the types of booze I make sure are always in stock, right down to the location of the bar itself, having a great bar makes all of this easy and fun. I’ve just finished writing a four-part series of tips for easily and inexpensively setting up your own bar at home. Even if you already have a cabinet full of liquor and you entertain regularly, I encourage you to take a quick look at our
 I’m not sure how or why it happened, but the “when” part is pretty clear. It was just before Christmas back in 1998 and we were at an office dinner party at the home of the Hostess’s new boss. Our jobs had taken us to a new part of the country a year earlier, and Hostess and I had recently gained some notoriety among our company’s skiing and happy hour cliques, thanks to a killer recipe she’d created for blended margaritas. “Have blender will travel” had become a bit of a mantra for us. And because, more often than not, I was the person operating the blender, I was beginning to get the hang of serving drinks to big, boisterous groups, and people were starting to associate me with really good adult beverages.

