It’s a couple of minutes past 5:00 pm and just as I am mentally switching gears to happy hour, I Read the Rest…
Happy Valentine’s Day
Valentine’s Day. Is this the holiday you love to hate, or is that just me? I mean, while I do Read the Rest…
French 75 Punch, Perfect For Your Holiday Party
While Jon and I are all about entertaining, admittedly we tend to enjoy hosting small, intimate gatherings over large, standing-room-only Read the Rest…
Berry Shortcake
It’s strawberry season here in our little neck of the woods, and I could not be happier. The local farms Read the Rest…
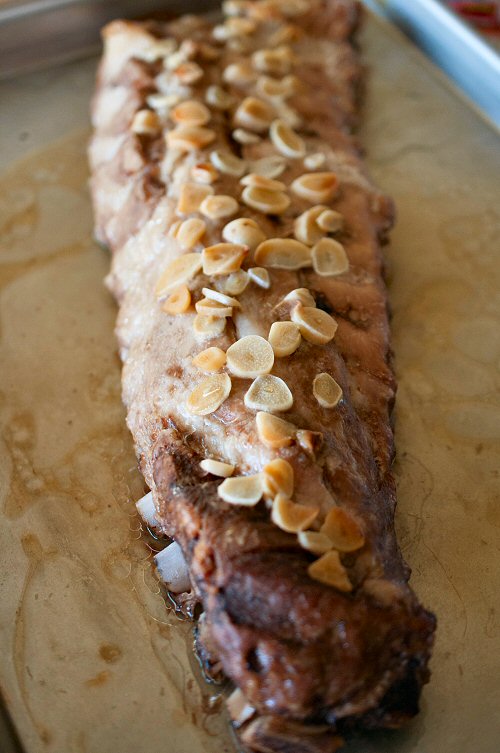
People who follow our blog know that when it comes to putting the food on the table, the Hostess and I have different roles. In general, Debbie runs the kitchen, while I handle the bar and the grill. We do our entertaining as a team, and when it comes to making the food and drink, our duties don’t usually overlap much. But when we make our slow-cooked pork baby back ribs, everything changes: This is a recipe where we each do some of the preparation, and some of the cooking. The collaboration results in something pretty spectacular!
Let me be clear – I’m the one who does all the grilling around here. And I thought I had a pretty decent process for my pork ribs: Low and slow on the grill, all day long from dawn ‘til dinner. That was, in my experience, the only way to get them fall-off-the-bone tender. But a couple years ago the Hostess came across a recipe that she wanted me to try. Initially I resisted (no surprise there – I’m pretty stubborn about making a change…unless it was my idea). But eventually I came around and we gave her recipe a try. The new approach involved cooking the ribs in the oven (heresy to a grilling purist!), letting them stand overnight in the fridge, and then finishing them for a couple hours on the grill the next day. The result? WOW. These ribs blow me away every time we make them. They are SO tender, juicy, and flavorful. Plus, they’re way less work than my old recipe. (Less work for me, anyway.) Read on for how we make ’em.
First we clean the ribs (this is my job because it grosses the Hostess out). We usually buy ribs in vacuum-sealed 3-rack packages because they’re easy to find and are cheaper than buying individual rib racks that have been prepped and cleaned by a butcher. The downside of saving a little money is that the ribs almost always come out of the vacuum pack with the membrane still on them. The membrane is a tough, thick, filmy skin-like layer that coats the inside of the rib rack. Not everyone goes to the trouble of removing it…but if you don’t, it shrinks and toughens as the ribs cook, it blocks smoke and other flavors from penetrating the meat, and you’ll eventually have to pick around it when you’re eating! The pictures below show how to easily remove the membrane.
Warning: The following page contains graphic “meat handling” content that may be unsuitable for viewing by those who are squeamish (or who’d prefer not to know what their food looks like before it reaches the dinner table).
Slip a thin knife between bone and membrane on the first 2-3 bones
Get a good grip…
…and peel away, all in one piece!
Once I’ve cleaned the pork ribs, my work is done until the next day. I turn them over to Debbie to work her magic. She adds a generous amount of thinly sliced garlic, roasts them in the oven for a couple of hours, seasons them, and then puts them in the fridge overnight.
Peel a bunch of garlic cloves
Slice garlic and scatter on the ribs
Out of the oven, 2 1/2 hours later
Smear the garlic and add seasoning
Here’s a good basic pork rub
A quick note on pork rubs: Some people prefer to make their own rub, and there are many recipes on the web for doing just that. A typical rub contains sugar, paprika, salt, pepper, and chili powder. We’ve found several store-bought rubs containing those ingredients that we think work great.
The next afternoon it’s time for me to get back to work. While I used to enjoy my up-at-dawn grilling process, this new approach really is easier and it doesn’t tie up the whole day. What’s not to like about that?
Next day – soaking the hickory chips
Grill is prepped and ready!
Ribs on the grill, hickory chips on the coals
Now we wait! We’ll add more hickory chips when the smoke stops
The beauty of our new pork rib recipe is that I still get to smoke the ribs on the grill, but it only takes a couple hours instead of all day, and the result is unapologetically, finger-licken’ good. These are the most tender, tasty, perfect ribs you will ever eat. The meat practically falls off the bone and into your mouth all by itself. Channel your inner caveman and dig in!
Adding some barbecue sauce. 30 minutes ’til we eat!
Contrary to tribal folklore, men really do appreciate something besides a bag of chips for football game snacks. It’s just that if they are asked to bring a snack, chips may be what they think of. So, here’s a way to impress your buddies on Super Bowl Sunday. Or any day, for that matter. Show them you’re the Grill Master with these Pulled Pork Sliders.
P.S. Women like these, too.
Pork shoulder, rubbed and ready for grilling…
Start by adding a little hickory smoke…
Tick…tick…tick…you can’t rush perfection!
Smoked and ready to finish overnight in the oven
The next morning: Time to shred! It smells SOOOO good!
Don’t be intimidated by the number of steps in the recipe. The only mistake you can make is to try to rush things with a grill that’s too hot. Low and slow is the key to grilling stardom. The real beauty of slow-cooking a pork shoulder is that it gives you an entire afternoon to lounge around drinking beer while simultaneously accomplishing something really incredible! What’s not to like about that?
We tend to be late adopters in general. You’ll probably never hear about some new technique or gadget here first. We sit happily on the sidelines watching and observing to make sure something is really valid before we jump in and start using it. But, when we do finally embrace something, rest assured we’ll holler from the rooftops with a level of gusto that will suggest anyone who has not yet jumped on the bandwagon is surely missing something big.
So it was with brining meat.
I just never really got the concept of brining. When people would explain it to me, they always sort of lost me after “salt.” What I didn’t realize, until experiencing the process for myself, is that when done correctly, the salt preserves the moisture and tenderness in the meat without making the meat saltier. Salt, when introduced to meat through a proper brining process, works to increase the moisture holding capacity of the meat, and also serves to help the meat absorb the seasonings from the brine mixture.
Our foray into brining started innocently enough. One day I returned from the grocery store with these nice, thick “center cut rib pork chops.” Because of the word “rib,” I had assumed they were just big, meaty pork ribs, and that we would cook them like we normally cook ribs. It was the Bartender that pointed out that they weren’t actually ribs but rather thick chops. And we had our dilemma.
The challenge was rooted in my childhood, as so many things are. My mom, being a mother in the 50’s and 60’s, had a propensity for over-cooking pork chops. It wasn’t her fault, really. She had been warned of the perils of eating under-cooked pork, and she was not going to be responsible for subjecting her family to what probably seemed like a fate worse than death: worms. I don’t know if people in those days actually got sick from under-cooked pork, but it was clear that my mother was not going to take the chance. She cooked pork chops to the point where a cobbler could have re-soled our shoes with them. But I should appreciate her effort. We never got worms.
So, I just grew up thinking that pork chops were something to be avoided, at all costs, unless of course I was craving a pork jerky of some sort. Hence the quandary with this large, family pack of pork chops now sitting in our refrigerator. I needed a plan. I started where I often do when I have a problem to solve: on the internet. Researching “how to cook a moist pork chop” I stumbled across all kinds of information about brining meat. And also about how today’s pork can safely be served at lower temperatures than when we were kids. My thoughts about both pork chops and brining started to shift.
As I started my journey down the brining path, I learned that brining meats is all the rage now in professional kitchens. Who knew? And, that the results are even better when the meat is cooked on a covered barbecue, which was great news because it meant I could delegate the cooking to the Bartender. The process is actually quite simple, which was also a plus.
There are just a couple of basic rules to keep in mind when brining. First, there is actually an optimal amount of time for brining pork chops. While opinions on perfect time vary slightly by recipe and source, we went with the 10 – 12 hour recommendation and found that worked well. (If you allow the pork chops to brine longer, they will actually start to absorb the salt and before you know it you’ll have ham.) Second, the brine needs to be completely cool before adding it to the meat. So you’ll need to plan ahead a little. If you’re pressed for time, you can use an ice bath to speed things along. Once brined, you can refrigerate the pork chops for several days before cooking, which for this Hostess is an ideal “make ahead” kind of thing. And, while I’m sure the process would work for any pork chops, we’ve always used the thick cut chops and have had great results (and rave reviews) each time. Finally, as with many recipes, don’t confuse kosher salt with table salt.
These pork chops have become one of our favorite dinner party main dishes.