


Pork Ribs: A “His and Hers” Recipe
People who follow our blog know that when it comes to putting the food on the table, the Hostess and I have different roles. In general, Debbie runs the kitchen, while I handle the bar and the grill. We do our entertaining as a team, and when it comes to making the food and drink, our duties don’t usually overlap much. But when we make our slow-cooked pork baby back ribs, everything changes: This is a recipe where we each do some of the preparation, and some of the cooking. The collaboration results in something pretty spectacular!

Let me be clear – I’m the one who does all the grilling around here. And I thought I had a pretty decent process for my pork ribs: Low and slow on the grill, all day long from dawn ‘til dinner. That was, in my experience, the only way to get them fall-off-the-bone tender. But a couple years ago the Hostess came across a recipe that she wanted me to try. Initially I resisted (no surprise there – I’m pretty stubborn about making a change…unless it was my idea). But eventually I came around and we gave her recipe a try. The new approach involved cooking the ribs in the oven (heresy to a grilling purist!), letting them stand overnight in the fridge, and then finishing them for a couple hours on the grill the next day. The result? WOW. These ribs blow me away every time we make them. They are SO tender, juicy, and flavorful. Plus, they’re way less work than my old recipe. (Less work for me, anyway.) Read on for how we make ’em.
First we clean the ribs (this is my job because it grosses the Hostess out). We usually buy ribs in vacuum-sealed 3-rack packages because they’re easy to find and are cheaper than buying individual rib racks that have been prepped and cleaned by a butcher. The downside of saving a little money is that the ribs almost always come out of the vacuum pack with the membrane still on them. The membrane is a tough, thick, filmy skin-like layer that coats the inside of the rib rack. Not everyone goes to the trouble of removing it…but if you don’t, it shrinks and toughens as the ribs cook, it blocks smoke and other flavors from penetrating the meat, and you’ll eventually have to pick around it when you’re eating! The pictures below show how to easily remove the membrane.
Warning: The following page contains graphic “meat handling” content that may be unsuitable for viewing by those who are squeamish (or who’d prefer not to know what their food looks like before it reaches the dinner table).

Slip a thin knife between bone and membrane on the first 2-3 bones

Get a good grip…

…and peel away, all in one piece!
Once I’ve cleaned the pork ribs, my work is done until the next day. I turn them over to Debbie to work her magic. She adds a generous amount of thinly sliced garlic, roasts them in the oven for a couple of hours, seasons them, and then puts them in the fridge overnight.

Peel a bunch of garlic cloves

Slice garlic and scatter on the ribs
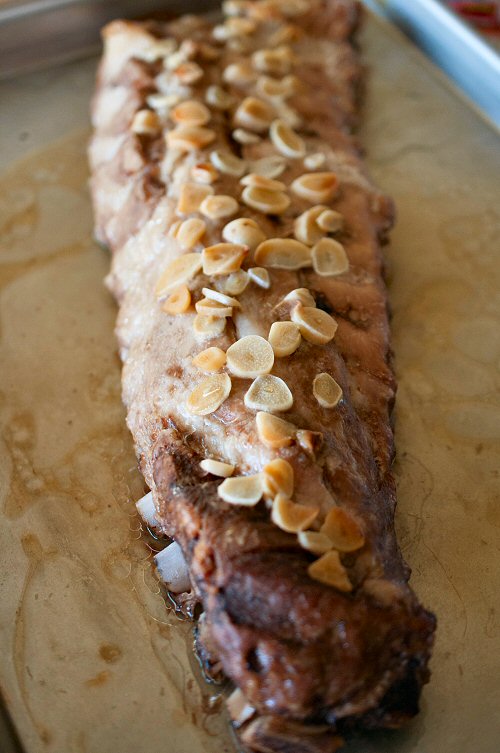
Out of the oven, 2 1/2 hours later

Smear the garlic and add seasoning

Here’s a good basic pork rub
A quick note on pork rubs: Some people prefer to make their own rub, and there are many recipes on the web for doing just that. A typical rub contains sugar, paprika, salt, pepper, and chili powder. We’ve found several store-bought rubs containing those ingredients that we think work great.
The next afternoon it’s time for me to get back to work. While I used to enjoy my up-at-dawn grilling process, this new approach really is easier and it doesn’t tie up the whole day. What’s not to like about that?

Next day – soaking the hickory chips

Grill is prepped and ready!

Ribs on the grill, hickory chips on the coals

Now we wait! We’ll add more hickory chips when the smoke stops
The beauty of our new pork rib recipe is that I still get to smoke the ribs on the grill, but it only takes a couple hours instead of all day, and the result is unapologetically, finger-licken’ good. These are the most tender, tasty, perfect ribs you will ever eat. The meat practically falls off the bone and into your mouth all by itself. Channel your inner caveman and dig in!

Adding some barbecue sauce. 30 minutes ’til we eat!
Click here to get recipe
